

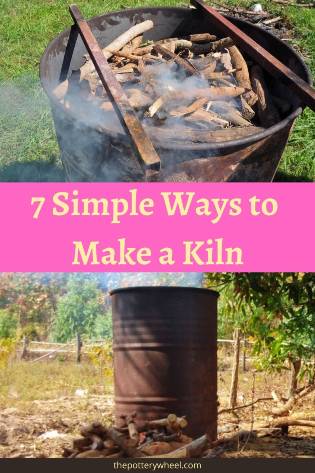
How To Set Up A Kiln
The Pottery Wheel is supported by its readers. If you click one of my links, I may earn a commission. I'thousand also a participant of the Amazon Chapter Plan and will make a commission from qualifying purchases. This helps me go on the website running. Thank you, I actually capeesh your back up!
In that location are numerous ways to build a kiln for pottery in your lawn. It needn't be expensive or complicated. In essence, you are making a sleeping room that can go up to high temperatures and stay at that place.
Disclaimer : This article is for advisory purposes and is not intended as advice most edifice a kiln. Kilns can exist dangerous. If you have any safety concerns please consult with a relevant professional for guidance.
On that note of caution, hither are some piece of cake and inexpensive ways to build a kiln for pottery.
How to Build a Kiln for Pottery: Method ane
Pit Firing
Pit firing is one of the oldest methods of firing pottery. If you want to build a kiln for pottery in your lawn, this is 1 of the simplest. You don't require any detail equipment, other than a shovel and some combustible material.
Pit firing can be used to burn down greenware pottery and arrive bisqueware. Or, you can bisque burn the pottery first, then wrap the bisqueware in aluminum saggars. The saggars let you to add lovely decorative finishes to your pots. I will say a little more about this after.
How to Pit Fire Pottery
First, permit's take a wait at how you actually pit burn your pottery. If you are going to pit fire, you need to exist prepared to dig a hole in your backyard. The size of the pit depends on the size and quantity of pottery that yous want to burn down. If you lot have a smallish collection (say five or 6 pocket-sized pots), a pit of around 1 foot is acceptable.
The pit needs to be deep plenty to protect the burn down from the wind. Only not and then deep that the burn is starved of oxygen. If there isn't sufficient airflow the fire in the pit won't reach high enough temperatures.
Pit fires can reach around 2,000F (1,100C) at their highest temperature. So, even at their highest temperature, they are a low burn method, and the pottery produced is earthenware.
If you lot are bisque firing greenware in the pit, it'due south a adept idea to do a pre-estrus. You can do this by lining your pottery upward around the side of the pit and burning a fire. This is a little similar candling your pots. The heat of the fire drives out moisture and helps prevent information technology from cracking in when put in the pit.
If your pottery is bisque fired, a pre-oestrus is non necessary. Different potters employ different combustible materials. One style of pit firing is to line the pit with sawdust. This is basically kindling. Then identify the pots on the kindling, and carefully comprehend the pots with sticks and woods. You do this every bit you would build a burn. Starting off with smaller pieces of woods that burn more than hands and building upwards to larger pieces on summit.
Colors and Flashing Effects in a Pit Fire
There are various ways to add flashes of colour to your potter. One style is to sprinkle powdered oxides into the sawdust and woods cloth equally you lot are building the fire. Skillful examples are copper carbonate and red iron oxide.
You can make little paper packets of the oxides and put them amongst the sawdust and wood. Or you lot can sprinkle the pulverisation directly onto the combustible material.
Alternatively, you tin make saggars for your pottery and put the oxides into the saggars. Yous can make saggars out of foil or by wrapping your pottery in organic thing such as banana skins. Potters will as well wrap their pottery in leaves or sweet corn leaves.
In addition, yous can add other agents similar salt and copper wire. All of these materials will add interesting colors and flashing effects to your pottery.
However, yous don't take to use salt and coloring oxides. Nor do you take to use saggars. If y'all merely place your pots straight into the fire, they will take on a smoky, intense, blackened look
The Pit Firing Process
With pit firing, you demand to continue to feed the fire with wood or combustible material. Once the burn is well established, some potters will use a metal flue over the fire to contain the heat.
A bisque fire can concluding around 5 to 6 hours. Towards the end of the burn the flames will take died down and the embers will be glowing.
Some potters will comprehend the embers with sand, peat, or dung to reduce oxygen levels in the pit. This causes a reduction temper and will intensify the blackened, carbonized look.
In one case the pit has cooled down, often overnight, you can uncover the pottery carefully. It will be covered in carbon and soot and volition need cleaning. Once cleaned up it tin can look stunning.
How to Build a Kiln for Pottery: Method 2
Brick Kilns
Another way to build a kiln for pottery in your back yard is to use bricks. There are various different ways to build a kiln for pottery out of bricks.
Some types of brick kilns are sometimes described every bit being a version of pit firing. The reason for this is that brick kilns can piece of work on the aforementioned principle of pit firing.
For example, some potters will make a pit in the basis and then line the pit with bricks.
Other potters will utilize brick to build a construction to a higher place the basis. Although they are building the bricks upward, rather than digging downward, the firing method is similar to pit firing.
With some brick kilns, you are simply creating a pit into which can put combustible material and pottery. It's just that the pit is being fashioned out of bricks rather than dug into the ground.
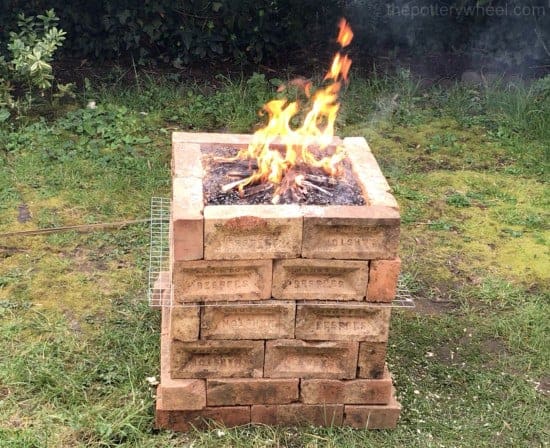
There are various dissimilar designs for building a brick kiln. You lot can make your kiln square or cylindrical. Foursquare brick kilns are easier to build. Then, if y'all are starting off, yous might want to attempt a foursquare one commencement.
Some potters advise on using burn down bricks to build a brick kiln. These can cope with high temperatures. Regular building bricks tin can sometimes crack with rut.
However, a lot of potters will use regular edifice bricks. In fact, environmentally-minded potters prefer to use reclaimed bricks. In an ideal earth, you would find a pile of old bricks that you could reuse. It's possible to purchase reclaimed bricks.
Nonetheless, they're popular with property builders because they have more than grapheme than new bricks. And so, ironically, they are more expensive than new bricks.
Edifice a Simple Brick Kiln:
After you have constitute a rubber identify to build your kiln, put a couple of layers of bricks on the footing. This will exist the base of the kiln.
Make up one's mind before how large you want the kiln to be. This volition depend on the size of the pieces you desire to fire. If you lot take a selection of minor pots, a kiln that is nigh 3-foot square is a manageable size.
Once you lot take congenital the base, you can start building up the brick walls. Plain, if you make the walls around three feet tall, your kiln will be square.
Y'all can add together a shelf into the kiln by sandwiching a metal grid halfway upwardly the kiln. To add the shelf, just balance the grid beyond the brick walls. Then add the adjacent layer of bricks on meridian of the filigree.
The top layer of bricks needs to take some gaps in information technology to allow for ventilation. Smoke and fumes demand to escape. Plus, a gap will allow a through draft, bringing in oxygen to keep the kiln alight. You can create ventilation by taking a few bricks out of one side at the top.
For a step-by-footstep guide on how to build and use a sawdust kiln, check out my video.
Using a Simple Brick Kiln:
Once you have the base of operations and walls built, you can load your kiln. Every bit with pit firing, potters use different combustible materials to fire in brick kilns. It's mutual nonetheless to start off with a layer of sawdust. Sometimes these are mixed with wood pellets or forest chips.
Nestle a layer of pottery in the mix, and and then cover this with more sawdust and or wood chips. You can then repeat this process calculation another layer of pottery. A metallic grid shelf volition allow you to put a few layers of pottery into the brick kiln.
In one case the pottery has been loaded, you tin can utilise paper or dried leaves every bit kindling on the summit of the pile.
As the fire burns, yous tin add larger pieces of wood as yous would a normal fire. When the fire is established you tin cover the meridian with a canvas of corrugated fe. Information technology's a good idea to weigh this downward with some more bricks.
A elementary brick kiln similar this can burn for effectually 12 hours. Eventually the sawdust and wood will burn itself out. Once the kiln is absurd you tin showtime to unpack it.
Y'all can download a free ebook on exactly how to build and fire a simple brick sawdust kiln here…

How to Build a Kiln for Pottery: Method three
Primitive Mud/Clay Kilns
Another very old way of making a kiln is to build it out of mud or dirt. Often the motivation for building a mud or clay kiln is to learn primitive techniques. The clay is often dug up from the ground nearby. Potters apply different materials. Some use mud or puddled adobe ( source ), others utilise dirt or mix the clay with straw to make information technology stronger.
In that location are various different ways of doing this, some with more than complex designs than others.
Put simply, a dirt kiln is made by edifice a cylinder of mud that is similar a thick-walled barrel. A very simple blueprint volition have an opening at the bottom of the cylinder where wood is fed into the base.
More complicated designs involve building a clay tunnel that runs out of this opening. This is tunnel protects the fire from air current and makes more room for fuel to exist added to the fire.
The lesser of the kiln becomes a firebox by putting a dirt shelf above where the burn burns. Holes are fabricated on the shelf so that the heat, fire, and temper can laissez passer through the kiln. The shelf can besides exist made out of a metallic grid.
How Does a Mud/Dirt Kiln Work?
A mixture of smoke and estrus passes out of the elevation of the kiln. Air is drawn through the opening at the bottom and passes through the kiln to a chimney at the elevation. Information technology is essentially a convection kiln.
Pots are placed on the top of the shelf and are fired as the kiln heats up. Wood is fed into the kiln through the opening at the base to go along the temperature loftier.
Slabs of stone, dirt, or concrete can be placed on the elevation of the chimney. This allows you to adjust the aperture of the flue, and the heat in. There need to exist some gaps in the covering to allow for ventilation. But not so much that all the heat escapes.
How to Build a Kiln for Pottery: Method 4
Barrel Kilns
Barrel kilns are considered to be another variation on pit firing. Like the brick kilns described earlier, a barrel kiln essentially works like an above-ground pit kiln.
Similar to the other methods of building a kiln for pottery, there are different types of butt kiln. They vary in design and complexity.
Simple Butt Kilns
Some potters simply fire in a barrel or steel garbage tin. They adapt the barrel by drilling a few holes effectually the base of the can. This allows for airflow. Airflow tin be enhanced by putting a layer of pea gravel in the base of the butt.
A layer of combustible fabric is placed on the gravel. This tin can be a combination of woods chips, sawdust and shredded paper. Pottery is placed on the showtime layer of burnable cloth.
This layer of pottery is then covered over once more with more wood. Every bit with the other methods, oxides and table salt tin can be sprinkled in to create flashes of color.
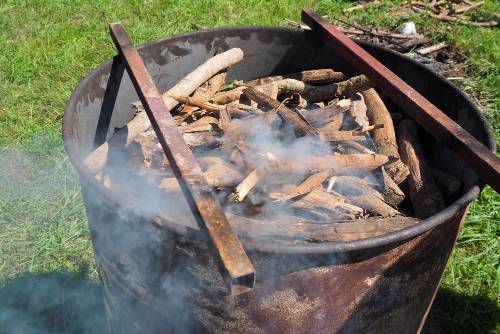
Once the butt is loaded, the mixture of wood, paper, and sawdust is set debark. The lid is and so placed on the barrel and left to burn.
More than Complex Barrel Kilns
A barrel tin can be made into an updraft kiln or a downdraft kiln. In an updraft kiln, the air is drawn in the bottom of the kiln. It then travels up and exits from a flue on the top. With a downdraft kiln, the opposite occurs. The air is drawn in the peak, travels downwards, and is expelled through a flue fastened to the base.
A barrel tin can be made into an updraft kiln by cut openings into the side of the butt at the bottom. And welding a chimney to the lid. Once the fire is going in the butt, the chimney tin can exist put on. You can control the amount of oxygen in the barrel by closing or opening the side holes at the base of operations.
Here is a great video made by Valetta Brenzon well-nigh potter Chris Dunn using a barrel to pit fire. He uses an updraft butt kiln and his pottery is lovely.
Alternatively, you tin can make a downdraft barrel kiln, past welding a chimney outlet to the base of the barrel. Once the fire is established, the lid is put on the butt. However, the lid is cracked and so that the air tin be drawn in and down.
How to Build a Kiln for Pottery: Method 5
Raku Kilns
Raku is a mode of firing pottery. Information technology involves heating pottery quite quickly to about 1800F (1000C). And taking it from the kiln with long raku tongs when it is however reddish hot.
The red hot pottery is then placed in burnable material like paper, sawdust, or straw. Oft the hot pottery is put in a metal bucket containing the newspaper or straw. The burnable fabric catches burn because of the rut.
In one case the fire is a calorie-free, a metal hat is put over the top of the saucepan. This restricts the flow of oxygen in the bucket and creates a reduction atmosphere. A reduction atmosphere means that there is less oxygen in the bucket. This causes the coat to take on particular colors and tones as it cools and goes solid.
Information technology is possible to buy kilns that are fabricated especially for raku firing. They accept lids that elevator easily and allow you to take the hot pottery out safely. They are also made so that the sudden drop in temperature when they are opened, does not damage them.
However, specially fabricated raku kilns are quite expensive, and you tin can build ane easily.
Building a DIY Raku Kiln
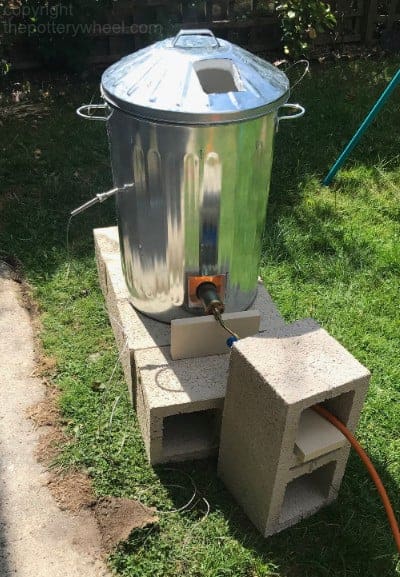
There are a few means of making a raku kiln. However, i of the most pop ways, it to make a trash can raku kiln.
A trash tin raku kiln is made from an onetime cleaned-out oil barrel or galvanized steel trash can. You cutting a 4 ten iv inch square at the bottom of the tin. This is the pigsty into which your flame volition be directed. Then you cut a iv x 4-inch pigsty in the lid of the can.
The tin is then lined with ceramic cobweb. Ceramic fiber comes in rolls and tin withstand loftier temperatures. It is fixed to the within surface of the trash can using ceramic buttons and something called nichrome wire. Nichrome wire tin also cope with high temperatures without melting.
To fire the kiln, y'all use a propane weed burner which is directed into the burner port at the bottom. The weed burner is attached to a tank of propane gas. You tin can track the rise in temperature using a thermocouple and pyrometer. A thermocouple is a slice of kit that measures very loftier temperatures.
To use a thermocouple, you will need to have made a pigsty in the side of the kiln. This pigsty needs to be virtually half the mode up the side.
In one case you lot have reached effectually 1800F, yous typically hold the temperature there for nigh five minutes. Then y'all carefully elevator the lid of the kiln. Using the tongs, y'all remove the pieces and identify them in the burnable material. The reduction atmosphere and the smoke from the cloth will requite the pottery its special raku look.
For a footstep by step guide on how to brand a raku kiln, bank check out my video.
How to Build a Kiln for Pottery: Method 6
A Wire Mesh Kiln
A wire mesh kiln is similar to the raku kiln described above in that it is lined with ceramic fiber.
Wire mesh kilns come in various different shapes and sizes, but the easiest ane to make is a square one.
As the proper noun suggests, the walls of the kiln are made from wire mesh. These are cutting to size and held together using either wire or strong metal clips. The inside surface of each side of the kiln is lined with ceramic fiber.
Like the raku kiln, a hole is cut into the bottom of ane of the panels. This is the pigsty through which your flame will heat the kiln. The flame is provided past a weed burner torch, linked upward to a propane tank.
If you lot desire to know how to connect a weed burner to a propane tank, cheque out this video.
The hat of the kiln is another wire mesh panel covered with ceramic cobweb on the within surface. It has a wire handle so you lot tin can lift it off at the terminate of the firing.
Whilst the firing is taking place the lid should be placed a little off-centre. This will make a gap along i top edge, making a flue from which fumes and gases can escape. It too allows the flames and oestrus to motion around and pass through the kiln. Ideally, the gap should be on the opposite side of the kiln from the burner.
At that place is a ceramicist chosen Ian Gregory, who has specialized in designing many types of wire mesh kilns. If you are interested in this particular arroyo, I'd recommend checking out his site for more information.
How to Build a Kiln for Pottery: Method 7
An Electric Kiln
Another way to build a kiln for pottery is to make an electric kiln. As with all the methods outlined above, in that location are quite a few ways of making an electrical kiln.
The basic thought behind making an electric kiln is to run electric elements through an insulated surface. Electrical elements are coils of wire through which an electric current passes. The elements estrus upwardly considering of the electric current and this heats the inside kiln bedroom.
One way to make an electric kiln is to make a metal frame using strips of bending metal with pre-drilled holes. The frame is so lined with fire bricks. Fire bricks are the insulating bricks used in electric kilns. They are quite soft brick and can cope with high temperatures.
Grooves are cutting into the surface of the burn brick and the electric element is pinned into the groove. The grooves run right the fashion effectually the kiln and so that the elements surround the inner sleeping accommodation.
Ii holes are drilled in the fire brick, ane at the point where the chemical element enters the kiln. The other is drilled at the signal where the element leaves the kiln. The elements are and then continued up to an electrical supply.
Whilst making the primary chamber of an electrical kiln tin exist quite simple, you practise demand some electric know-how. If you don't know about electricity, you need to involve a registered electrician in your projection. The most important thing is to keep safe. So, if you don't know what you are doing with electricity, go help from someone who does.
Safety Precautions
If you lot do build a kiln for pottery, here are some general safety considerations:
- It's usually recommended that yous build any kind of kiln at to the lowest degree 15 feet away from nearby buildings. But this may vary from region to region.
- Yous should check out if your local jurisdiction allows you lot to build a kiln for pottery in your backyard or not. And if so, if they have any particular requirements regarding the location and specification of the kiln.
- Make sure that there is no grass, vegetation, or overhanging trees that could catch alight. And brand sure that the ground is even so that your construction is stable.
Terminal Thoughts
There are many ways to build a kiln for pottery. Some are more than complicated than others. As you lot accept read, the methods range from excavation a pit in your lawn to making an electric kiln. Each method will produce quite unlike results with your pottery. Either mode, it is entirely possible to make your own kiln and save yourself the expense of buying one.
If you enjoyed this post, please share it!
Source: https://thepotterywheel.com/build-a-kiln-for-pottery/
0 Response to "How To Set Up A Kiln"
Post a Comment